How to Create a Stuffed Animal: A Step-by-Step Guide
Creating a stuffed animal can be an exciting craft project that blends creativity, sewing techniques, and a touch of imagination. Whether you’re creating a toy for your child or a present for your loved ones or even a prototype for the launch of a new production line, the process is both enjoyable and fulfilling. This guide will focus on the topic of how to create a stuffed animal, providing you the necessary steps to make your own custom stuffed animal from start to the end.
Step 1. Plan Your Design
1. Choose Your Character or Concept
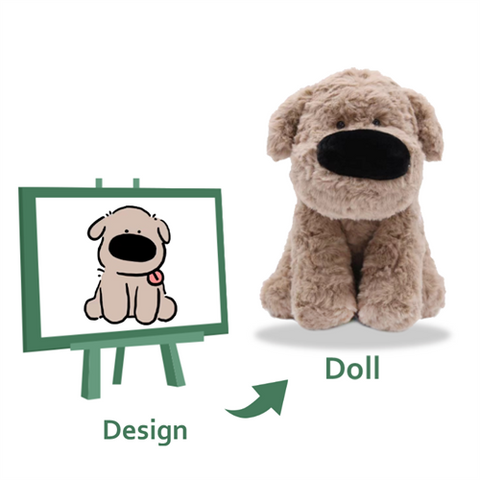
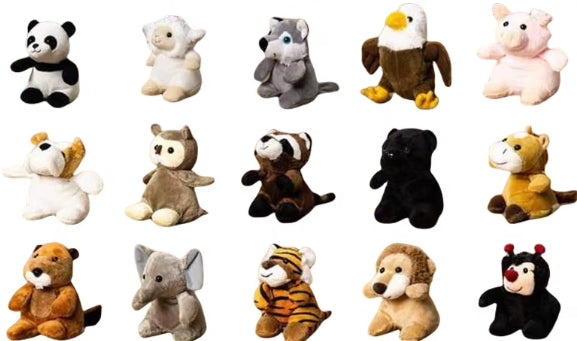
Every good stuffed animal starts with a spark of creativity. Imagine the type of creature or person you’d want to recreate–perhaps the classic teddy bear or a funky dinosaur, cute kitten, or an imaginative monster of your imagination. The possibilities are endless and the subject you choose will influence the design’s shape of your design, the color, and the features of your creation.
2. Sketch and Visualize
After you’ve decided on your idea, sketch your stuffed animal from a variety of angles. The drawings needn’t be elaborate or artful masterpieces, but they should aid in imagining the scale and proportions of the design. Pay attention to elements such as the dimensions of the head in relation with the rest of the body. Also, consider the position of limbs and distinct features like tails that are floppy, ears that don’t fit or wings. Or horns.
3. Decide on Size and Style
You should think about how big you’d like your stuffed animal to be. smaller plushies are better to handle for novices and cost less and larger ones are excellent gifts for a special occasion or as huggable pet. You must also choose the design: is it realistic, stylized, or cartoonish? This will affect the fabric you choose to use and your the construction methods in the future.
4. Think About Function and Audience
Consider what the stuffed animal was made to be used for. A toy designed for a child should make use of soft materials and not have pieces that can be removed, whereas an ornamental plush may include more delicate decorations. Knowing the goal of the creation from the beginning helps to guide your decisions from pattern-making through finishing details.
Step 2. Gather Materials for Creating a Stuffed Animal
| Material | Purpose | Notes |
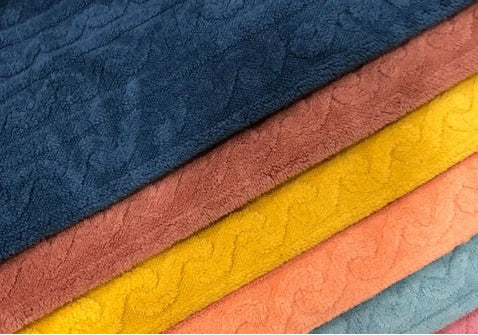
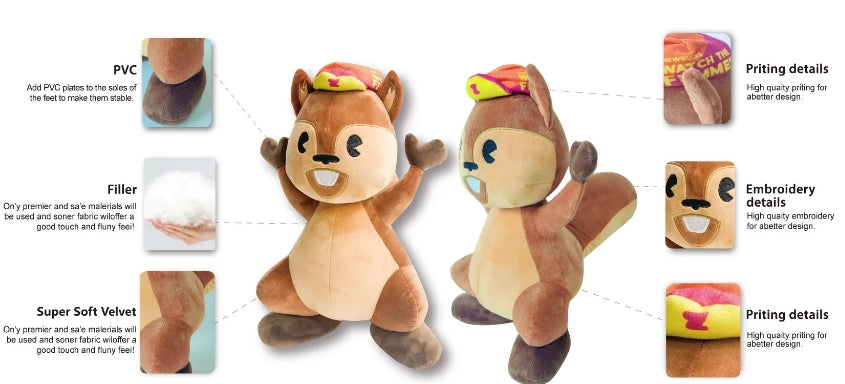
| Fabric | The outer body of the stuffed animal | The most popular plush fabric choices are minky, fleece, felt and cotton. Choose soft, durable types. |
| Stuffing | Fills in the interior to create a shape | Polyester fiberfill is standard. recycled materials or cotton are available as alternatives. |
| Sewing Thread | In order to stitch all the parts to one another. | The color should match that of the fabric to achieve a sleek appearance. |
| Needles or Sewing Machine | Tool to assemble fabric pieces | Hand sewing for precision and speed; machine sewing to increase speed and power. |
| Scissors | Thread and cutting fabric | Fabric scissors provide cleaner cuts. |
| Pins or Clips | Make sure that the fabric pieces are in position prior to sewing | Aids in alignment and accuracy. |
| Pattern Paper or Templates | Cutting guides and guidelines for cutting shapes | Print or hand-drawn patterns. |
| Fabric Marker or Chalk | Making cutting lines on the fabric | Select washable or disappearing ink. |
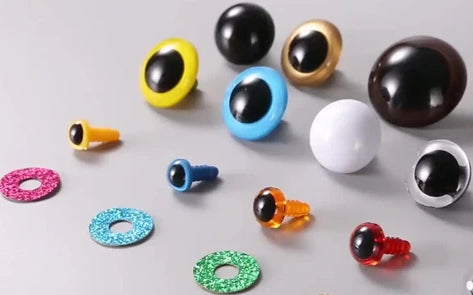
| Safety Eyes or Buttons | To create eyes or decorative items | Make sure to use embroidered eyes for your child’s security. |
| Embroidery Floss | Make facial features or add details | Ideal for mouths, noses or for customized designs. |
| Optional Accessories | Personalization and decor | Ribbons, clothes, patches, Velcro, zippers, etc. |
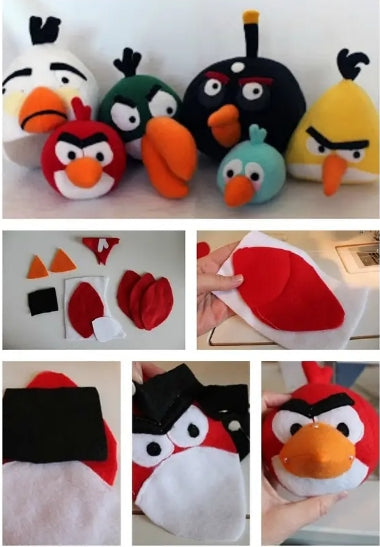
Step 3. Choose or Create a Pattern for Your Own Stuffed Animal
1. Selecting a Pre-Made Pattern
If you’re a novice at sewing or would prefer a pre-made option download a pattern that has been made is a great way to begin. There are numerous templates that are free and pay online, featuring designs that range from basic animals to elaborate fantasy creatures. The patterns usually come with steps-by-step directions, which makes them perfect for novices or those seeking ease and organization.
2. Designing Your Own Pattern
If you’re looking for something more personal making your own pattern gives you complete creative freedom. Begin by breaking the sketched animal into simple shapes–circles ovals, and rectangles that could be utilized to make the body, head and limbs, as well as ears and tail. Draw each piece on paper, bearing in mind the size of your stuffed animal. Be sure to include seam allowances. They are the extra fabric edges necessary to stitch the pieces together, without compromising the original shape.
3. Labeling and Testing
Each piece of fabric must clearly labeled with information like “cut 2,” “on fold,” or “mirror image.” Before cutting into the final fabric it’s recommended to make the prototype with a simple fabric like muslin. This lets you test the dimensions and fitting of each piece, and make any adjustments you need to make without using up your primary fabric.
Step 4. Cut Out Fabric Pieces for Creating a Stuffed Animal
1. Prepare Your Workspace
When cutting fabric for the first time, make sure you have the surface in a neat, flat place that you can work on comfortably. Be sure your patterns are well-organized and smoothed, and your tools, like sharp scissors for fabric pins, pins, or markers for fabric are all ready to utilize. It is important to use your fabric with care to prevent stretching or warping it when cutting.
2. Trace and Align with Grain
Place the patterns on the fabric in accordance with the grainline markings. This will assures your stuffed animal retains its form and doesn’t get bent after sewing. Make sure to trace each piece onto the reverse of the fabric using a tailor’s chalk or even a washable marker for fabric. Make sure you mark any points or notches to help you align the pieces when sewing.
3. Cut with Precision
After everything is traced then carefully cut every piece of material along the traced lines. Make sure your cuts are smooth and precise, particularly around corners or curves, because they will determine how neat and well-formed your finished animal will appear. Utilize fabric-only scissors to get the most effective results, as dull or general-use scissors may cause the material to tear or pull.
4. Cut the Right Quantity
Check the number of piece you have to cut. Certain parts, such as the ears or arms, may need two parts (often mirrors) and others, like the body can be cut using folded. Making a mistake or cutting with the incorrect direction may result in mismatched parts therefore, be sure to take your time to ensure precision.
5. Organize and Label
After cutting, arrange the pieces of fabric in accordance with body parts and identify them, if required. Organising everything helps to streamline the sewing process, and also prevents confusion, especially when you have similar cut pieces.

Step 5. Sew the Pieces Together for Creating a Stuffed Animal
| Step | Description | Tips |
| Start with smaller parts | Sew tiny features such as arms, ears or tails first. | Sew them in the right-hand side facing into the fabric, and be sure to leave enough turning gaps. |
| Attach Details if Needed | Make facial characteristics (like eye embroidered and safety eye) prior to assembling the entire thing. | Use safety eyes to sew the body to the body. |
| Join Main Body Sections | Sew the back and front body parts together. Leave a gap to stuff it with. | Backstitch at the beginning and the end of seams in order to ensure. |
| Turn Pieces Right Side Out | Turn all sewing parts to the right side after sewing. | Make use of a chopstick or a blunt pencil to create corners. |
| Assemble and Attach Parts | Inject small pieces (ears and legs) into the main body after you sew it shut. | Put the pieces in place prior to sewing to ensure that they are in the correct position. |
| Leave Stuffing Gap | Always leave at least a 3 to 4 inch gap within the body to allow for stuffing. | The bottom or back is a popular choice to fill the gap. |
| Hand Stitch Final Seams | Make use of the ladder (invisible) stitch seal the openings after stuffing. | Cleans seams and almost invisible. |
Step 6. Stuff the Stuffed Animal
| Step | Description | Tips |
| Choose Your Stuffing Material | Utilize cotton, polyester fiberfill or alternative eco-friendly products. | Fiberfill is light, washable and has a good shape. |
| Begin with small Areas | Begin by filling the limbs or ears. You can also fill other smaller parts first. | Make use of a pencil, chopstick or a stuffing tool to push fillings into corners. |
| Fill Gradually and Evenly | Mix in small quantities of stuffing to avoid lumps and guarantee uniform shape. | Rotate and adjust as move to ensure the symmetry. |
| Adjust Firmness | Determine how firm or soft the toy is in relation to the use and design. | To make toys huggable, choose medium-firm. For ornaments go a bit firmer. |
| Distribute Stuffing Carefully | Press and massage the stuffing until there are no the gaps or unevenness. | Take note of the shape from as many angles while you fill it. |
| Add Weights if Desired | Put beans or pellets on the bottom to create the weighted feel or “beanie” feel. | Utilize a pouch to store loose pellets safely. |
| Leave Space for Final Stitch | Stop stuffing just prior to the opening so that there is room to close the seam. | Do not overstuff the area around the gap to facilitate stitching. |
Step 7. Close the opening after stuffing the Stuffed Animal
Once the stuffed animal is fully and completely filled, it’s the time to seal the opening. This is usually done by hand, using the ladder stitch (also known as the invisible stitch) that hides threads between layers of fabric to create a neat seamless look. Be sure to place with the edge of your opening and then stitch slowly to give the toy a durable and neat appearance. This last step does not just secure the stuffing, but it also gives the toy a polished and professional appearance.
Step 8. Add Final Touches for Your Own Stuffed Animal
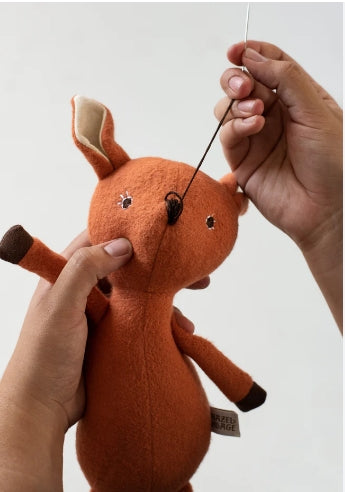
1. Attach Facial Features and Expressions
When your custom plush toy is complete and sealed, you can add personality. Face features such as eyes and a nose mouths are possible with the help of fabric paint, embroidery or safety features. To create a child-safe, handmade alternative, embroidery floss can be stitched to create smiley faces or adorable whiskers. Make sure to place these details correctly to make sure your pet has the perfect look, be it sweet, sleepy or funny.
2. Add Accessories and Decorations
To make your animal extra special, think about adding some fun accessories. Little bows, scarves caps, or even removable clothes can add appearance and charm. If you’re creating toys that are themed such as the superhero or ballerina, these additional accessories can will help to complete the look. Velcro or snaps may be used to secure items that are removable but ribbons and trims should be stitched securely to avoid slipping if the item is intended for the child.
3. Personalize with Names or Messages
An excellent method of making your pet truly uniqueis to personalize the animal. You can sew an initial on the belly, or embroider the initials of a foot or even sew a tiny heart with the words inside. Personalization makes the toys more personal and perfect for special occasions such as baby showers or birthdays.
Step 8. Safety Check for the Custom Stuffed Animal
| Safety Check | Purpose | What to Look For | Recommended Action |
| Secure Attachment of Parts | Beware of choking hazards arising from button eyes, loose eyes or other decorations | Gently tug on the noses, eyes and sewn-on accessories | Re-sew or replace any components that are loose |
| Non-Toxic Materials | Be sure the material is safe if they are touched or mouthed | Check that fabric, stuffing and paints are labelled non-toxic. | Use child-safe, certified materials for toys designed for children. |
| No Sharp Edges or Wires | Avoid injuries to external or internal parts | Check seams for pokes cables or other sharp items | Securely cover or remove any sharp parts |
| Strong Seams and Stitching | Make sure stuffing doesn’t leak and the components remain in place | Pull and press seams to determine the strength | Strengthen weak seams by adding stitching |
| Avoid Small Detachable Parts | Beware of choking hazards, specifically for children younger than 3 years old. | Look for beads, buttons or other loose embellishments | Replace with embroidery, or fix small pieces |
| Washability and Durability | Check to see if the toy can be cleaned without causing damage | Review the fabric and washing instructions | Use washable materials and give the necessary guidelines for cleaning |
| Proper Labeling | Include information on safety and how to care for your child. | Tags should include age recommendations and instructions for care | Use clear labels, particularly for commercial sales |
Summary
The process of creating your own stuffed animals lets you make your imagination come to life. Through practice, you can experiment with different fabrics, design new patterns and even transform your ideas into a small-scale business. This process blends the arts, crafts and a bit of engineering.