
Hat Patch Sizes: How to Choose the Right Size for Custom Hats
So you’re ordering custom headwear for your brand, your team, or maybe a promotional event. One thing that makes or breaks the final look? Hat patch sizes. Get it right, and your hats look sharp, balanced, and professional. Get it wrong, and things go sideways. Literally. The patch might look oddly proportioned against the hat. It might pucker the fabric when worn. Or the whole design just feels… off.
We’ve seen it happen. And that’s exactly why we put together this practical guide. Based on what actually works in custom hat manufacturing, we’ll walk you through how to choose the right patch size. No fluff. Just real, usable advice.

What Is the Standard Hat Patch Size?
Let’s cut straight to it. In most custom hat production runs, the rectangular patch that gets used the most measures 3 inches wide by 2 inches tall (that’s about 7.62 cm x 5.08 cm). If you are leaning more toward a round or square design, you will commonly see diameters in the 2.25 inch to 2.5 inch range (roughly 5.71 cm to 6.35 cm).
Why do these sizes show up so often? Simple. They play nice with the front panel proportions on most standard hats. They look balanced. They fit comfortably within that prime real estate on the front of a cap. But here’s the thing—there is no universal, one size fits all rule in this industry. Every hat style is a little different. So to get the best result, you really do need to match the patch size to the specific hat you are using. And that depends on what you are ordering and where people will wear it.
Hat Patch Size Chart for Different Hat Types
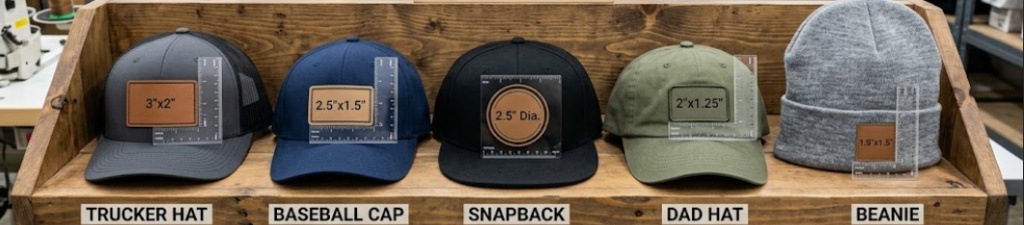
To give you a clearer picture, we pulled together a quick reference chart. It shows the most common size ranges for different hat styles. And more importantly, it tells you why those sizes tend to work best. This is the kind of insider knowledge that helps you avoid rookie mistakes.
| Hat Type | Common Patch Size | Why (Customization Insight) |
| Trucker Hat | 3″ x 2″ or 3.5″ x 2.5″ | The front panel of our Trucker Hat is tall with a rigid interior structure – like an inner billboard! This can help support larger patches without flopping over or folding under. |
| Baseball Cap | 3″ x 2″ | Baseball Cap, 3″ x 2″, This timeless design is timeless. The medium front height ensures it fits comfortably while still offering protection. Perfect for active wear. |
| Snapback | 3.25″ x 2″ or 3.5″ x 2.5″ | Snapbacks have an eye-catching streetwear aesthetic and make an excellent accent piece when worn with oversized geometric patches that complement their bold profile. |
| Dad Hat | 2.5″ x 1.5″ | These are unstructured soft caps. They curve and shape to your head when worn. A smaller patch prevents the front panel from turning stiff and creating those weird bulges on the sides. |
| Fitted Hat | 3″ x 2″ | Fitted caps have a classic, symmetrical structured crown. The front panel is clean and stable, so the standard 3×2 size is the go to for a polished, traditional look. |
| Beanie | 1.5″–2.5″ wide (limited by cuff height) | The patch has to sit entirely within the folded cuff area. Smaller and slightly flexible sizes keep the edges from curling up when the stretchy knit fabric is pulled. |
How to Choose the Right Hat Patch Size
Choosing the right size is not just about picking a random number. Experienced designers tend to balance a few practical factors before settling on the final dimensions. Let’s break those down.
Consider Your Hat Front Panel Size
Every hat has a “usable zone” on the forehead area. A good rule of thumb—keep your patch within 60% to 80% of the available front panel space. That gives you a little breathing room. You want a clear border between the edge of the patch and the brim stitching or the top seam. This keeps the cap patch placement looking intentional and not cramped.
Match Patch Size With Your Logo Design
Your logo’s shape should influence the patch’s proportions. Got a long horizontal logo with a bunch of text? You will probably want something like a 3.5″ x 1.5″ wide rectangle. That layout gives the text room to breathe. If your logo is a compact circle or a shield, a 2.25″ diameter patch usually looks more balanced. Trying to squeeze a wide, text heavy logo into a square patch? That is a fast track to an unreadable mess. The hat logo size will be too compressed, and no one will be able to make out your brand name from more than a few feet away.
Leave Enough Space Around the Patch
Here is a practical production tip. You generally want to maintain at least 0.25 inches (about 0.64 cm) of clear space between the patch edge and the structural seams of the hat. This little buffer zone does two things. First, it creates a natural visual frame that helps your design pop. Second, it makes things easier for the sewing team during production. They have a little wiggle room for accurate placement without fighting the seam allowance.
Patch Material Affects Your Hat Patch Sizes
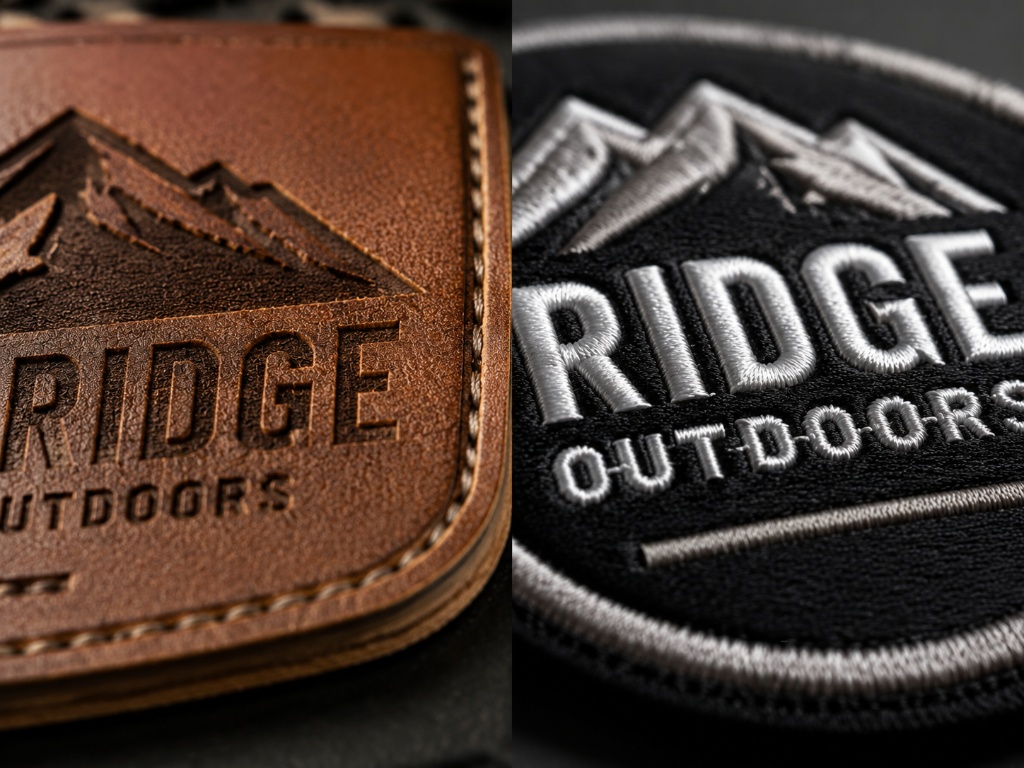
Not all patch materials are created equal. Each one has physical limits when it comes to reproducing fine details. And those limits can influence the minimum size you can get away with. Here is a quick breakdown to help you decide.
| Patch Material | Best For (Style) | Size Consideration |
| Leather | Vintage, workwear, high end minimalist logos | Heat and pressure can cause slight edge bleeding. Very tiny text is a bad idea. |
| Embroidered | Classic, traditional branding and sports logos | Thread has actual thickness. Need enough space for needle and thread to weave properly. |
| PVC | Modern, techy, or highly detailed graphics | Molded process is more precise. Works surprisingly well for small sizes and intricate artwork. |
Leather Patches
Leather patches—whether genuine or faux—are usually laser engraved or heat pressed. The heat and pressure naturally cause a tiny bit of spreading at the edges. Fine lines can get lost or blurred.
Best practice: Keep the overall patch size at 2.25 inches or larger. And try to avoid using letters smaller than 0.1 inch (about 2.5 mm) tall. They just do not come out crisp.
Embroidered Patches
Embroidery is all about thread interlocking. Since each stitch has physical volume, there are strict limits on how small you can go. If you push it too far, the threads just overlap and turn into a fuzzy blob.
What we recommend: Based on the thread interlocking principles outlined in Wikipedia’s Machine Embroidery technical overview, you want independent letters within your design to be at least 0.19 inches (roughly 5 mm) tall. Anything smaller, and the stitches start to crowd each other. Legibility goes out the window.
PVC Patches
PVC rubber patches are formed in molds. This is a huge advantage for intricate artwork. Compared to leather or embroidery, PVC does a much better job preserving sharp edges on fine lines and tiny details.
Size note: You can comfortably shrink a PVC patch down to 1.75″ or 2″ and still keep complex tech style lines or small lettering perfectly readable.
Still torn on which material will do your logo justice? You might want to check out our Custom Hats & Beanies page to see what we offer. Or just reach out to our online team directly. We can look at your specific artwork and give you honest material recommendations and sampling advice.
Where Should You Place a Patch on a Hat?
The front center is the classic go to. No question. But current trends in headwear offer some interesting alternatives depending on the look you want.
Front Center Patch: The all time standard. The patch sits centered horizontally and vertically on the front panel. Clean, symmetrical, and professional. Great for staff uniforms or promotional caps.
Side Patch Placement for Fitted Hats: This one is gaining a lot of traction in sports and streetwear. The patch goes on the left or right side, sitting around the temple area. A 2″ to 2.5″ wide patch works well here. Perfect for an anniversary mark or a secondary logo that complements the main branding.
Back Hat Patch Placement: Located above the rear adjustment closure. Usually lower profile and rectangular—think something like 2″ x 0.75″. This gives a subtle, refined brand touch on the back. Understated but classy.
How Hat Patch Size Is Measured
Clear communication with your manufacturer makes the whole process smoother. Understanding how they measure and evaluate things helps avoid mix ups.
Width and Height Measurements
Most hat patches are ordered and described by their total width and total height. Pretty straightforward. For example, you specify a 3″ x 2″ rectangle. Or you give the diameter for a round patch, like a 2.5″ circle. This is the most intuitive language between you, your designer, and the factory. No room for confusion.
Measuring Irregular Logo Shapes
Got a custom shield shape? A mascot head? Something with a unique outline? In these cases, the manufacturer usually measures the overall bounding box. That means the widest point and the tallest point of your design. Say you have an irregular animal logo that is 2.5 inches wide at its widest and 3 inches tall at its highest. The factory will treat it as a 2.5″ x 3″ patch for tooling and layout purposes.
How to Measure Your Hat Before Ordering a Patch
You do not need a fancy workshop to get this right. Here is a simple 4 step process you can do at your desk.
Step 1: Measure front panel width. Grab a soft tape measure. Check the actual width and height of the flat area on the front panel of your hat. That is your starting point.
Step 2: Check available patch area. This is where you consider the physical structure. There is a helpful overview in Wikipedia’s entry on Trucker Hat structures that explains the difference between stiff front panels and softer ones. Once you have your measurement, subtract about 0.25 inches from each side of the panel. This gives you a realistic idea of the “safe” area for placement.
Step 3: Compare logo proportion. Print your logo on plain paper at a few different sizes—try 2.25″, 2.5″, and 3″. A regular office printer works fine for this.
Step 4: Create a sample before production. Cut those paper logos out and tape them onto a blank sample hat. This old school trick helps you see, with your own eyes, how the proportions will look before you commit to a full production run.
Common Hat Patch Size Mistakes to Avoid
Over the years, we have seen a few recurring pitfalls. Here is what to watch out for.
Choosing a patch that is too large. Say you sew a huge, heavy leather patch onto a curved hat front. Leather does not stretch or bend easily. It could cause the hat fabric to pucker and bulge around the patch area. The hat just will not sit naturally on your head.
Making detailed logos too small. Trying to cram a complex family crest—with multiple colors and tiny text—into a 1.5 inch embroidered patch? That almost never works. The thread gets overcrowded. Letters bleed into each other. All that careful detail turns into an unreadable blur.
Ignoring hat structure. You cannot treat all hats the same. A stiff, tall rectangular patch sewn onto a soft, unstructured dad hat? That is asking for trouble. Without a stiff inner lining to support it, the weight of the patch can drag the fabric backward and cause it to wrinkle and fold over itself.
FAQ About Hat Patch Sizes
Q: What is the most common patch size for a trucker hat?
For trucker hats, the industry standard is a 3″ x 2″ rectangle, or a 2.25″ to 2.5″ round patch. That size range fits beautifully within the rigid buckram area on the front of a trucker cap. It hits the sweet spot for visibility and balance.
Q: Why can’t beanie patches be too large?
Beanies are stretchy. When you pull one on, the fabric expands quite a bit. The patch material—whether it is thick leather or dense embroidery—stays rigid. If your patch is wider than about 3 inches, that rigid patch will fight the fabric’s natural stretch. Over time, the edges can curl, the stitching can pop, or worse, the patch can actually damage the knit material.
Conclusion
Finding a manufacturer who will review your patch size, material and placement before production can be invaluable – saving costly errors from occurring later on that may require costly fixes after your hats have already been manufactured.
Remind yourself of the basics: match your patch to the specific hat type; give your design some breathing room; respect physical limits of material you select – these steps should get you well ahead.
Are You Searching For Help Navigating This Maze of Commitments and Documents? Implementer helps brands turn approved designs into production ready custom hats. Reach out to us for expert guidance on materials, sizing, and sampling.