Embroidery vs Printing for Custom Plush Toys: Which Method Wins for Your Brand?
How do you handle the facial details, the brand logo, and those decorative patterns on a custom plush toy? It makes a huge difference. We’re talking about texture, how long the thing actually lasts, and whether it passes safety checks. Two methods dominate the conversation: embroidery and printing. Neither one is a magic bullet for every design.
Embroidery gives you that raised, textured, built-to-last feel. Printing, on the other hand, is the go-to when you’ve got complex graphics or need a riot of color. And honestly? First-time buyers get stuck right here, spinning their wheels over embroidery vs printing for custom plush toys. It’s a common headache.
This article walks through everything. The way the processes actually work. How they look and feel. Detail accuracy. Long-term wear and tear. What it does to your budget. Safety and compliance headaches. Even down to which fabrics play nice with which method. The goal is to help you figure out what makes sense for your brand.
What Is Embroidery on Plush Toys
Embroidery is pretty straightforward. You take colored thread and a computerized machine punches it right into the surface of the plush fabric. They can program the density, the angle, and the color. It’s all digital.
When you’re dealing with custom plush toys, embroidery is the usual suspect for eyes, noses, mouths, the brand mark, text, or small decorative bits. Since you’re building the image with thread instead of laying down ink, the detail ends up with this slight bump. A real dimensional look.
The upside of going with embroidery:
The texture feels premium. That 3D thread work screams “well made” in a way that ink just can’t match.
It’s tough as nails. The thread is locked into the fabric structure. Wash it, play with it, it’s not going to flake off or fade on you.
Safety is a big one here. Because those stitches are embedded, there’s no little piece waiting to snap off. Zero ink chemistry means zero phthalate or heavy metal drama. For baby toys, this is the first choice for a reason.
Where embroidery falls short:
Don’t try to cover a massive area in solid stitching. It gets expensive fast, and the fabric puckers up like a prune.
Gradients are a no go. You’re stuck with the thread colors on hand.
And on really shaggy, high pile fabrics? The fluff swallows the stitches whole.
What Is Printing on Plush Toys?
Printing is all about laying the artwork on top of the fabric instead of stitching through it. If the design has crazy detail, gradients, thin lines, or stuff that embroidery would just chew up and blur, printing is how you get it done.
Depending on what you’re after, you might be looking at screen printing, heat transfer, or digital printing. The best call here depends entirely on the fabric type and how gnarly the artwork is.
The upside of printing:
Color freedom, finally. You can get photo-real details and smooth gradients without worrying about thread counts.
It’s the king of large areas. All-over prints and full body patterns are where printing really shines. And the cost doesn’t balloon the way embroidery does when you scale up the image.
The finish is smooth. The ink sort of becomes one with the fabric. If you want to keep that original soft hand feel, this is the ticket.
Where printing falls short:
Durability of custom plush toys can be a weak spot. Screen print ink sitting on top? It’s prone to cracking or peeling after a few rounds in the wash or a lot of roughhousing. Sublimation is tougher because the dye sinks in, but it’s picky about fabric.
Fabric is a huge limitation. Printing hates high pile. If the hair is over 3mm, the edges of the design start looking like a blurry mess.
And then there’s the safety checklist. That ink better have ASTM F963 or EN71 backing it up, or you’re looking at a potential heavy metal problem.
Embroidery vs Printing: Key Comparison
Quick Overview: Embroidery vs Printing on Plush Toys
If you’re in a rush and only have half a minute, here’s the snapshot:
| Dimension | Embroidery | Printing |
| Texture | Raised, dimensional, high end | Flat, smooth, color saturated |
| Durability | Incredibly strong, thread locks into fabric | Sublimation holds up; screen print cracks over time |
| Color Range | Limited by thread stock, no good for gradients | Photo quality and smooth gradients are a breeze |
| Best Application | Small spots, logos, faces, lettering | Big areas, wild patterns, all over body art |
| Safety (Kids) | Embedded, no loose bits | Needs certified non toxic inks and a solid grip test |
Detailed Comparison of Embroidery vs Printing on Plush Toys
Look and Feel
Embroidery creates this raised, textured effect. Makes the face and the logo look more deliberate. More expensive. That slight sheen on the thread is something ink can’t fake. It says, “Someone actually cared about making this.”
Printing is flatter, sure. But man, can it hold a lot of visual information. It’s just better for stuff with shading, tight gradients, or super fine little bits.
Put simply: Embroidery adds the texture. Printing gives you the visual wiggle room.
Getting the Details Right
Embroidery loves a simple shape. Bold outlines, cartoon eyes, a clean logo. No sweat. But the moment you throw in thin lines, soft fades, or tiny lettering, it starts to struggle.
Printing eats that stuff up. It’ll spit out your original art with all those fine lines and complicated color mixes intact. If matching the original art exactly is the hill you want to die on, printing is usually the safer bet.
How Long Will It Last
Embroidery is a tank. The design is part of the skeleton of the toy now. It’ll take thousands of rubs without flinching. It’s why you see it on the high-friction zones like the nose or paws. And it’s why premium logos are almost always stitched. They need to survive.
Printing? It’s on the surface. Under the same stress, screen print tends to micro-crack as the soft filling underneath flexes against that hard shell of ink. Sublimation is better here. The dye moves in; it doesn’t just sit on top.
Cost and That MOQ Factor
Which one hits the wallet harder? Well, that depends on how many you’re making and how crazy the design is.
| MOQ Range | Better Bet | Why |
| 100 to 500 units | Printing or a mix of both | Embroidery setup costs are a killer on small runs. Printing is friendlier here. |
| 500 to 2000 units | Whatever the design needs | Those fixed costs are spread out thin enough now. Focus on the look and safety. |
| 2000 plus units | Embroidery or a mix | Volume kicks in. Embroidery cost per piece drops and can hang with printing. |
If you’re dipping a toe in with less than 500 pieces, maybe start with printing or that hybrid approach. Once the sales numbers prove the design works, you can always bump it up to full embroidery on the reorder.
Safety Stuff and Red Tape
If this is heading to the US or Europe, listen up. Doesn’t matter if you stitched it or printed it, that toy needs to clear ASTM F963 and CPSIA (for the US) or EN71 (over in Europe).
Why embroidery is a natural fit for compliance: Those stitches are part of the fabric. Nothing to snap off. And zero ink means you sidestep the whole heavy metal conversation automatically. For that 0 to 3 age bracket, you usually have to use dense embroidery instead of those hard plastic eyes anyway. It eliminates the choke risk completely.
What you need to know for printing: Non-toxic inks only. Ask for the paperwork, the MSDS, and the third- lab stuff. And that screen print? It had better pass the adhesion test. You don’t want it peeling off into a kid’s mouth.
Matching Fabric to Method
Before you commit to a technique, look at the fabric for plushies. Seriously. It’s one of those things people forget and regret later. Some fabrics just hate certain processes.
Here’s the lay of the land for common plush fabrics when we talk embroidery vs printing for custom plush toys:
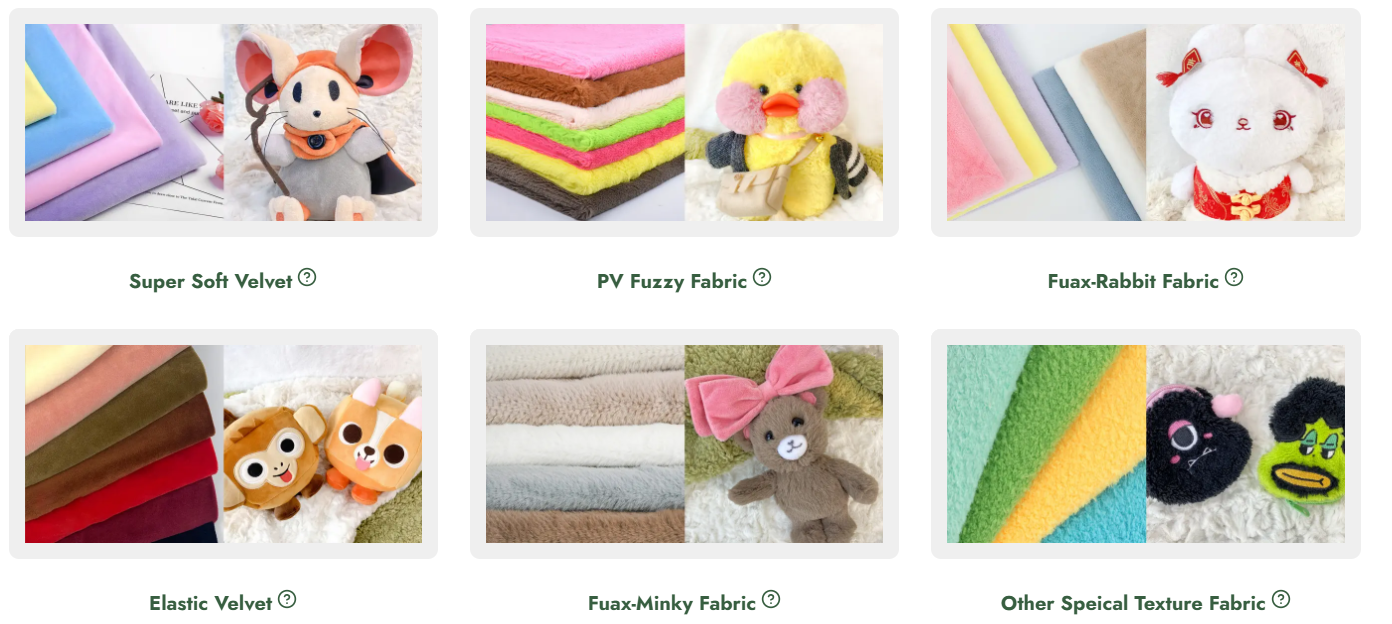
| Fabric Type | What It’s Like | Good for Embroidery? | Good for Printing? | The Rundown |
| Super Soft Velvet | Smooth, fine pile (1 to 3mm) | Excellent | Good | The workhorse. Plays nice with crisp stitches and holds color well in print. Best all rounder. |
| PV Fuzzy Fabric | Really soft, a bit taller (2 to 4mm) | Workable | Good | Feels like a dream, perfect for gifts. Just watch the stitch tension so you don’t get puckering. |
| Faux Rabbit Fabric | Tall pile, mimics bunny fur | Workable | Skip it | Soft as heck, but the fluff hides the stitches and turns prints into a smudge. Keep designs simple here. |
| Elastic Velvet | Short pile with a bit of give | Good | Good | Handles stretch fine. Use a stabilizer on the machine and you’re golden. |
| Faux Minky Fabric | Ultra fine, slight sheen | Good | Excellent | Super short pile. Both methods come out looking sharp. Great for high end stuff. |
| Special Texture Fabrics | Whatever the job calls for | Case by case | Case by case | You gotta test these. No two are exactly the same. |
A quick note on picking fabric: If the face needs to stay sharp and survive a beating, Super Soft Velvet plus embroidery is the combo you want. If you’re chasing that cloud soft touch, PV Fuzzy or Faux Minky with embroidery can work, just keep an eye on the tension. And if the whole body is a massive, detailed print? Super Soft Velvet or Faux Minky with printing is the way to go.
Embroidery vs Printing: Which One Should You Choose?
So, back to the million-dollar question: Embroidery vs printing, which is the winner?
There isn’t one. Not really. It’s about what fits your brand, your wallet, and your product.
| What Matters Most | Go With This |
| Safety is number one (babies) | Embroidery |
| Replicating crazy, detailed art | Printing |
| That high end, premium perception | Embroidery |
| Keeping costs low on a small test run | Printing or Hybrid |
| Covering a huge area with a pattern | Printing |
| Crisp faces and sharp logos | Embroidery |
And that Hybrid idea? Don’t sleep on it. Stitch the face for safety and that premium feel, then print the body to catch all that wild detail. You get the best of both worlds on a single toy without sacrificing the design.
Implementer: Your Reliable Custom Plush Manufacturer
You probably have a better idea of which direction to lean now. Still, when you’re staring at specific fabric swatches or a messy sketch and a tight budget… new questions pop up. That’s just how custom projects go.
Who is Implementer?
We’ve been at this custom plush toys game since 2012. We run both computerized embroidery lines and digital printing setups under the same roof. That means whether you land on embroidery vs printing or that hybrid middle ground, your order isn’t bouncing between different factories. One team. One standard. One timeline.
Here’s how we help:
Free Custom Design. Our team takes your idea and turns it into a digital mockup. And we’ll revise it as many times as it takes until you nod your head yes.
Low MOQ. Most stuff starts at 100 pieces. No pressure to order a shipping container full of toys just to see if they sell.
Quality and Safety Checks. We use top-shelf materials and check every single item. We’re talking 100% inspection. And we’ve got the badges for it: SGS, ASTM, CPSIA, CPC. Crucial stuff if you’re leaning toward printed designs.
Rapid Turnaround. Production can wrap in as little as a week or two. We partner with DHL, UPS, and FedEx to get the boxes to your door.
If you’re about to pull the trigger on a plush project, maybe start with a conversation about the process. Figuring out the right decoration method early saves a ton of detours later on.
FAQ
Q1: The product is for a kid under three. Embroidery or printing?
A: Lean hard into embroidery. With the 0 to 3 set, safety runs the show. Embroidery stitches are part of the fabric. There’s nothing to snap off and no chemical stew from the ink. It’s the natural fit for ASTM F963 and EN71. In fact, for that age group, the face details almost always have to be embroidered.
Q2: The design has photos, gradients, or super complex illustrations. Can embroidery handle that?
A: Not really, no. You’re limited to the colors of thread you have. Smooth fades and photo realism just aren’t in the embroidery wheelhouse. If you try to force it, it looks off and the price tag gets scary. Printing, especially sublimation, is the tool for that job.
Q3: My brand is positioned as premium or collectible. Texture is everything. What’s the call?
A: Embroidery is the play here. That three dimensional texture and the way thread catches the light… it shapes that first impression. “This thing is quality.” For high end lines or limited drops, embroidered faces and logos are pretty much standard.
Q4: I’m testing the waters with 500 units. Which method is easier on the budget?
A: Look at printing first. Or a hybrid approach. When you’re only making a few hundred, the setup fees for embroidery (the digitizing) hit the per-unit cost pretty hard. Printing setup is usually lighter. Once you know you’ve got a hit and you bump up the volume, then you can switch to full embroidery if you want.
Q5: The toy is covered head to toe in wild patterns. What’s the move?
A: Printing. All day. Large, all-over patterns are exactly where printing flexes its muscles. Trying to stitch a whole body? Your costs will skyrocket, and the fabric will end up looking like a wrinkled mess.
Q6: The face is simple but the body has crazy details. Do I have to pick just one method?
A: Nope. That’s the beauty of the hybrid. Stitch the face so it’s safe and sharp. Print the body so you keep those wild details looking crisp. You can have both on the same toy without breaking the bank or sacrificing the design.